Introduction
BASIC CARE AND CLEANING OF A ‘STANDARD’ COPPER AND BRASS DIVER’S HELMET
By Dr Mike Burchett
ETHICS OF CONSERVATION AND RESTORATION
‘Standard’ hard hat diver’s helmets are highly collectable, and the older, more sort after models of past manufacturers now command high prices. Therefore it would seem sensible to look after a helmet that has accumulated a life time of character along the way. However, all too often, helmets are acquired at great expense, only to have their character and surface patinas destroyed by over-correction and polishing, for no other reason than aesthetic looks. The root of this problem lies somewhere in the past. Our eyes are readily drawn towards a gleaming steam engine with freshly painted livery, or a motor vehicle brought back to perfect working condition. Traditionally, metal wares including copper, brass and silver were constantly cleaned to a mirror finish, regardless of the damage being done to the surfaces. However, attitudes are slowly changing and a more thoughtful, conservative approach is being adopted towards the preservation of helmets and other associated diving apparatus. In today’s market, a valuable piece of antique wooden furniture would not be systematically over-restored, altered or stripped of the patina to satisfy current aesthetic trends. To do so would be to destroy its character, history and value. If a historical artefact is placed in the care of a museum, the main priority is to stabilize and conserve the item for the future, and aesthetic considerations are not given top priority. It is hoped that a similar more enlightened approach will be adopted by owners of historical diving apparatus in the future.
Having said all this, few people
would wish to display a filthy helmet that has cost a good deal of money. This
article is not about restoration, but focuses on cleaning a diver’s helmets in a
more appropriate way for display. It also assumes the helmet is in a reasonably
stable condition and it will not be used for historical diving purposes.
Although this article is written in good faith, the outcome of any cleaning work
undertaken on a helmet is the responsibility of the individual concerned.
However, I hope the article is useful for those who do wish to adopt a more
enlightened approach to the care and cleaning of their diving apparatus. It is
worthwhile reading around the subject, as opinions differ among conservators as
to the most appropriate treatments, which are constantly evolving and being
improved.
HELMET MATERIALS
Luckily, old diver’s helmets are relatively simple pieces of apparatus that are
ruggedly constructed to withstand use, abuse and the underwater environment.
They are mostly made from various ‘non-ferrous’ materials including copper (Cu),
tin (Sn), zinc (Zn), Admiralty bronze (‘G1’), Naval bronze (‘gunmetal’),
Admiralty brass (‘CZ111’), Naval brass (tinned brass: ‘CZ112’) and soft solder
(tin/lead mix). Nominally, brass is an alloy of copper with zinc, whereas bronze
is an alloy of copper with tin. The words ‘brass’ and ‘bronze’ are often used
interchangeably, which causes confusion when examining old diving equipment. The
chosen cleaning materials must be suitable for all these metals and their
alloys, as they are generally found together in the construction of a helmet.
The cleaning materials must not damage any other soft materials used in the
helmet, for example, natural rubber seals and leather gaskets of the neck ring
and face plate.
SOME DOS AND DON’TS
Avoid: stripping, polishing, lacquering, painting and re-plating surfaces
wherever possible.
Avoid: using chemicals to artificially age helmets as it will never look correct
and it can seriously damage the metal of a helmet. Allow a helmet to age
naturally.
Avoid: removing factory applied lacquers and paints. Instead, clean stabilize
and wax them.
Avoid: using household detergents and cleaners, liquid metal polishes (the
residues are hard to remove and causes further tarnishing), car polishing
compounds, ammonia, vinegar, lemon juice, acids, salt, abrasive powders,
abrasive papers and cloths, wire wool, mineral oils and stiff wire brushes
(especially steel ones). Basically, anything that is harsh, reacts with, or
scratches a metal surface.
Avoid: over-wetting areas with water, but instead use a sponge, cloth, or
absorbent cotton wool moistened with water. Flooding the internal helmet
communication system is not a good idea.
Do: be patient and do not rush tasks. If in doubt stop, think and if necessary
consult an expert. Each helmet will have its own individual problems.
Do: try a treatment on scrap material before trying it out on the real thing. A
successful outcome may depend upon trial, error and practice in the first
instant. It is sometimes difficult to reverse treatments, therefore proceed with
caution.
Do: undertake cleaning tasks by hand (not with the aid of machinery and power
tools). There is then less likelihood of accidental damage or over doing a
treatment.
Do: use solvents that can safely be used to clean metals, which include white
spirits (cheap and available), acetone (smelly but useful), ethanol (vodka will
do) and clear methanol.
Do: use clean tap water which is normally fine for most rinsing purposes.
Suitable cleaning agents include ‘conservation grade detergent’ (‘cgd’ such as ‘Vulpex’).
Always use ‘cgd’ sparingly and rinse well afterwards. A cheaper, more readily
available alternative is mild hypoallergenic liquid skin care soap which is
unperfumed and undyed.
Do: use cleaning compounds that are formulated for conservation work. If it is
necessary to use a cleaning compound, a little ‘Pre-lim’ is useful (see
addresses). The best method of protecting cleaned surfaces is with
‘conservation’ wax. One of the leading conservation waxes for use on virtually
any material is ‘Renaissance’ Wax. This blended microcrystalline wax was
formulated by the British Museum and is now in use worldwide for many
applications. Once dry, it is hard enough to prevent finger marks appearing.
Although it is relatively expensive, a little does go a long way, and it lasts
for years. It can be readily removed with white spirits (thus reversible), and
the helmet will only require an occasional dusting and waxing every few years.
However, do read the instructions for the use and application of these products.
Do: support a helmet properly during treatments. A simple padded surface (e.g.
thick foam cushion wrapped in a towel) is useful and helps prevent the helmet
from rolling around, or even worse, dropping onto the floor.
Do work in a well ventilated area (especially with acetone); use disposable
gloves (nitrile rubber gloves last longer with solvents) and when necessary, a
disposable mask. Gloves also prevent finger contamination which can cause
tarnish during the finishing stages of de-greasing and waxing.
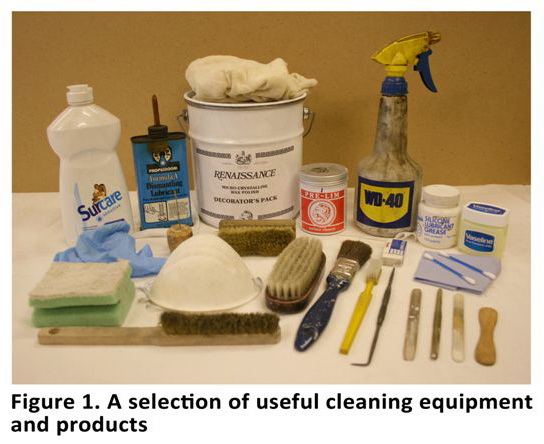
Useful cleaning tools and consumables include natural bristle brushes; old soft
tooth brushes; plastic picks; wooden spills (lolly sticks); bamboo picks; soft
plastic scrapers; a metal scriber; a strong straight needle; hair drier (use
warm to cool to speed up drying); lint-free soft cloths and rags; soft plastic
scouring pads; cotton wool and cotton buds; small sponges; ‘WD 40’ light oil or
easing oil (for those hard to undo fittings); silicone grease and petroleum
jelly (pure Vaseline).
CLEANING PROCEDURES
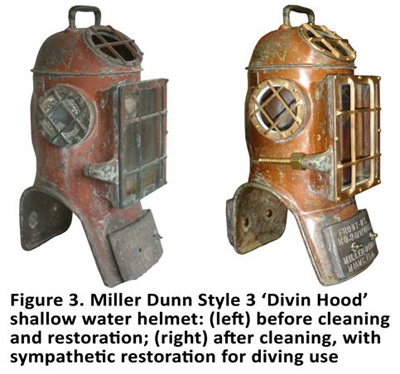
1. First check the helmet for signs of factory lacquering (some continental
helmets are lacquered). A lacquered coating in good condition should be left in
place and preserved. The same is true for original factory applied paintwork
(for example on ‘Miller-Dunn’ shallow water helmets).
2. Disassemble some helmet parts (e.g. valves, spitcock etc.). Fittings and
components that are readily removed will not be in the way, and are more easily
cleaned off the helmet. Carefully remove the leather gaskets from the neck ring
and face plate, and keep them flat for later cleaning. Take disassembly photos
if you are unsure how the re-assembly sequence may go. It is also a good record
of progress before, during and after helmet treatments.
3. Always try each stage of the cleaning process or a treatment on a test area,
or test piece to see if it is suitable for the material (preferably in an area
that will not be seen). Remember there is often little chance of reversing a
treatment; therefore proceed with care and caution.
4. Clean the helmet and parts with water and a damp sponge inside and out (do
not flood). If the helmet is heavily soiled with dirt, use a little
‘conservation grade detergent’ (‘cgd’). Threads and hard-to-reach corners may
require the use of a soft bristle brush (old tooth brush). Once the helmet is
clean, damp rinse surfaces to thoroughly remove any remaining detergent
residues.
5. Clean the helmet again, but this time using a solvent (e.g. white spirits)
which will remove any grease or wax deposits. If the face plate and neck ring
channels have accumulated deposits of green ‘verdigriz’ where the leather
gaskets are seated, it should be thoroughly cleaned. Sometimes it may be
necessary to scrape the channels with a sharpened bamboo spill, followed by
light scrubbing with a soft plastic scouring pad and solvent.
6. (Optional step). If the helmet has achieved the desired look, then proceed to
the waxing stage. However, if the helmet and parts require a more thorough
clean, then proceed with the cleaning compound. Use a little ‘Pre-lim’ cleaning
compound and a soft application cloth. Apply with a light circular rubbing
motion in small areas, and work into adjacent areas for an even tone. Complete
the major copper areas first, then the fittings afterwards. Once the residue is
dry, lightly buff the surfaces with a clean soft cloth. (Follow the ‘Pre-lim’
instructions).
7. If step 6 has been undertaken, then re-clean the helmet with solvent to
remove any remaining cleaning compound residues. A warm to cool hair drier may
be used to thoroughly dry the helmet.
8. Corselet stud threads (and any other threads) can be lightly buffed with a
soft bronze brush. This will also remove any fine particles of trapped dirt that
remain.
9. Leave the helmet and parts to stand for a few hours. Apply a thin coating of
‘conservation’ wax (e.g. ‘Renaissance’ Wax) to all surfaces within 24 hours of
solvent cleaning. A soft bristle brush is ideal for those hard-to-reach areas,
otherwise use a soft cloth for application. Leave for the recommended time
before buffing. It may be necessary to repeat the waxing for a second time (read
the instructions).
10. Leather gaskets will often have accumulations of in-grained oil and dirt,
but may be cleaned by the following procedure if they are in good condition.
While keeping the gasket flat, thoroughly clean both sides using a 1:1 mix of
water and alcohol (e.g. acetone, or ethanol vodka and water). A short soaking
may be required. With the leather in a damp (half dry) state, rub in a minimum
amount of ‘neatsfoot’ oil with the thumb and forefinger. Remove any excess by
blotting with a dry tissue. Place the leather gasket back into position. Olive
oil and coconut oil are ‘not’ good choices, as they are prone to oxidisation,
causing discoloration and hardening of leather.
11. Re-assemble all parts of the helmet. Smear a little ‘silicone grease’ or
‘petroleum jelly’ on internal threads before assembly, but take care not to
spread it onto the newly waxed surfaces.
|
|
|
|
|
|
HELMET DISPLAY AND STORAGE
Helmet display is the choice for the individual. However, helmets that do not
readily stand by themselves need some form of support. A slatted wooden stand
(natural hard wood is best) will not only look presentable, but allows some
ventilation under the helmet. A cotton towel placed between the stand and helmet
will prevent chemicals from the wood affecting the corselet surface.
For long term storage, use bags made of breathable woven polyester (e.g. ‘tyvek’) or a well washed, large white, cotton pillow case. Do not seal helmets in polythene (e.g. bubble wrap) for long periods as this may seal in moisture, causing corrosion problems later on. Humidity changes with the seasons and location, which may cause condensation to form on a metal surface. Therefore store the covered helmet in a dry place.
SUPPLIERS OF CONSERVATION
MATERIALS
Picreator Enterprises Ltd. (email:
www.picreator.co.uk). Suppliers of materials for professional restoration
and conservation, and manufacturers of ‘Renaissance Wax’.
An in-depth report on the “CARE AND CLEANING OF DIVER’S HELMETS AND SOME
OTHER DIVING APPARATUS” can be obtained from the author.
ACKNOWLEDGEMENTS
Robert Burchett (graphics and photos).